For our first project in graphic design this year, we did a series of Adobe Photoshop tutorials. We learned several very helpful things and I learned to use some of the tools in ways I never knew I could. Tools such as Content Aware Fill and Clone Stamp were essential in the editing and making of these photos.
Content Aware Fill
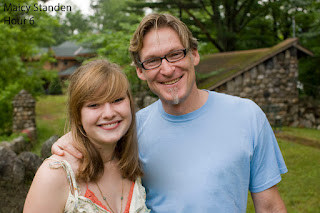
Content Aware Fill is used to remove unwanted elements from images. By simply selecting an area of a photo, this tool makes the area blend in better. For example, The picture on the left previously had a rather unattractive graphic on the father's shirt, but using Content Aware Fill, I changed the shirt to be entirely blue. This was a fairly easy tool to to work with and it has great results.
The Patch Tool
The Patch Tool is another easy and important tool we used. This tool is primarily used to fix large areas of an image or get rid of unwanted blemishes. The picture to the right previously had a hook and many black smudges and spots on the wall but using The Patch Tool I easily removed them. This tool is very similar to Content Aware Fill, except it is more precise.
The Clone Stamp
The Clone Stamp is used to remove dirt, pimples, or any imperfections from things such as faces. It takes a sample from another part of the face and uses that to cover up the said thing you are trying to remove. The picture to the left originally had dirt and many spots on his face, but using this tool, I removed them and the results were quite natural.

Healing Brush Tool and Spot Healing Brush
The Healing Brush Tool allows you to fix image imperfections such as scratches and blemishes. By sampling the surrounding area you can blend the imperfections into the rest of the image.
Spot Healing Brush is an easy, but lifesaving tool.You simply click on the blemishes you want to get rid of (or drag with the tool to paint over the larger areas you wish to repair) and the spot healing brush works out the rest for you.
Portrait Collage
This was by far the hardest as the tasks. I struggled to make the pictures blend together and look good. Making a portrait collage took all of the tools and immense patience and focus. I used Content Aware Fill, Patch Tool, Clone Stamp Tool, Healing Brush Tool, and Spot Healing Brush.
All of these skills I learned during the Photoshop tutorials will be extremely useful and important in any future I may have of graphic design. Going into these projects, I had no idea how to use the different tools in Photoshop. This definitely made certain parts of these projects pretty difficult. The first few were pretty easy and I didn't have any problems. However, after doing the harder projects at the end, I feel I could have redone a few of the earlier ones so they could look more professional.While most of these were all pretty easy to understand and produce, the portrait collage was a major bump in the road. This one was extremely detailed and complicated and I struggled with blending them all together. I also had trouble with the little boy's face because I couldn't get the clone stamp to work properly.
All in all, I am very pleased with my work. Although I had some hardships along the way, It ended up being a great learning experience and I can't wait to put forth these skills in projects outside of class.


